Student Project: Go-Pro Case

Image

Image

by Sunny Raj Singh,

In this project a student needed to test a prototype case design for a Go Pro camera. His assignment was to design a way for the Go Pro camera to be safe when dropped from a high distance, thus printed prototype being used to test impact stress and fit of his design. Print

Print Specifications: Layering: 0.2mm, Temperature: 220 degrees, Infill: 100%, No support structure, Print Speed: 100mm/s

Student Job: Tray System

Image

Image

by Paris Cockinos,

Tray was needed as an insert into already modelled tray holder. Printed in a high quality green 3mm filament as tolerancing required was small.

Print Specifications: Layering: 0.1mm, Temperature: 220 degrees, Infill: 80%, No support structure, Print Speed: 90mm/s

Water Tightness Test

Image

Image

I wanted to explore the applications of FDM process and whether it was able to create water tight models. Due to the layering and infill process used in FDM i was intrigued to see what quality and infill settings would be needed to make a model water tight. The cup model above was printed with 100% infill and a layering of 0.2mm, it was able to hold water but not for long. Unfortunately the model could only contain the water for around 5 minutes before leaks started to appear.

Print Specifications: Layering: 0.2mm, Temperature: 220 degrees, Infill: 100%, No support structure, Print Speed: 85mm/s

Student Project:

Image

Image

Image

Image

Kevin Peng’s Tray Project,

In conducting the research I was also approached by numerous students regarding print jobs for assignments. This was great experience as it illustrated the capabilities of the technology in fabricating jobs for students, which is great insight in understanding what is required by students and thus appropriate these requirements to the new Faculty based digital printing facility.

Print Specifications: Layering: 0.2mm-0.1mm/s (Depending on part), Temperature: 220 degrees, Infill: 30%, No support structure, Print Speed: 105mm/s

Reproducing Products

Image

Reproducing Products

Progress models,

I was able to work with the Cancer Research Facility on campus in reproducing discontinued items/products for the research facility. The job was some what challenging in that the pipe had small necessary details that was required to slot the pipe into the holder. However due to the intricate nature of the sits needed to be replicated and amount of models required, the FDM process wasn’t suited in reproducing the product. Also due to the number of require reproductions of the pipe, it was decided that 3D printing the items wasn’t viable option and other manufacture options should be considered for mass production.

Print Specifications: Layering: 0.1mm, Temperature: 220 degrees, Infill: 70%, Support Structure used, Print Speed: 70mm/s

Student Job: Plane Design Exploration

Image

PlaneDesign by Taz Chuck,

20130925_200817 20130925_200829 20130926_172928

A student wanted to test the aerodynamics on a thesis design aircraft however was pushed for time and needed the model ASAP. The model was printed in a matte white filament in various parts, glued together then post processed with spray paint for aesthetics. The whole process was fast tracked and completed within 6-8 hours, a little sand was required to smooth out rough edges where overhang occured due to fast printing speed.

Print Specifications: Layering: 0.1mm-0.2mm, Temperature: 220 degrees, Infill: 70%, No support structure, Print Speed: 120mm/s

Free Support Vase

Image

Free Support Vase

When printing free supporting parts its nessary to use support structures. Calibrating the machines layering properties and retraction rate I was able to print free supporting features up to a 50 degree angle before support structure were needed to retain a high layering quality and sound struture.

Print Specifications: Layering: 0.2mm, Temperature: 220 degrees, Infill: 80%, No support structure, Print Speed: 85mm/s, Retraction Rate: 40mm/s, RRDistance: 4.5mm

Print Calibration

Image

Print Calibration

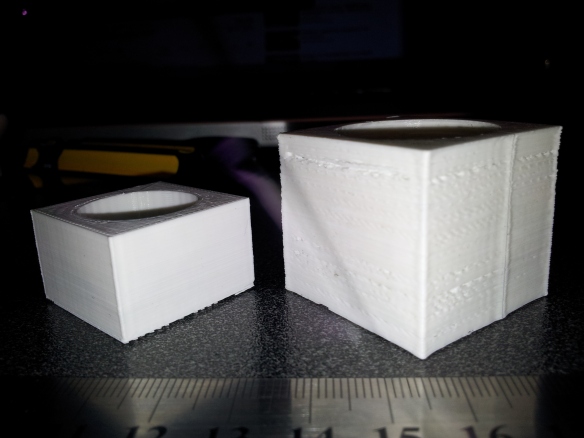
In using the machine I was able to calibrate and achieve near perfect prints with a balance of quality and speed. To achieve a perfect calibration a range of adjustments needed to be made to the printer physically, and to the software (Cura). Due to the Wooden frame of the printer, weather conditions affected the bed platform leveling making the bed either too low or too high; daily adjusted was needed to keep alignment. The stepper motors bands also needed to be tighten as loose bands will decrease accuracy and rods need to be well lubricated to ensure smooth movement of the nozzle. Software wise, adjusting Cura’s settings gave prints more refinement. Adjusting the layering thickness, temperature, speed, infill and retraction speed all contribute to high quality prints. Depending on the model these settings would have to be adjusted to fit to task at handThe machines extruder steps also had to be recalculate so layer steps, as seen in the picture ‘right cube’, weren’t missed and extruded evenly.

Left Cube: Achieving a high print quality calibration, 0.02mm

Print Specifications: Layering: 0.02mm, Temperature: 220 degrees, Infill: 60%, No support structure, Print Speed: 80mm/s, Retraction Rate: 40mm/s, Overlap 0.2mm, Filament Size: 2.85, Flow: 100%

Right Cube: Orignal Print quality

Print Specifications: Layering: 0.2mm, Temperature: 220 degrees, Infill: 60%, No support structure, Print Speed: 80mm/s, Retraction Rate: 80mm/s, Flow: 80%, Filament Size: 2.5